Extracapsular Prostate Brachytherapy Using Iodine-125 for Intermediate and Selected High-Risk Prostate Cancer: Technical Notes
Affiliations
- 1 Department of Radiation Oncology, Kaiser Permanente, Los Angeles Medical Center, Los Angeles, CA
Introduction:
Our aim is to describe extracapsular prostate brachytherapy (ECPB) techniques using low-dose-rate (LDR) for patients with intermediate-risk prostate cancer (IRPC) and selected high-risk prostate cancer (HRPC).
Materials and Methods:
Using stranded iodine-125 seeds, dose can be extended to the capsule and seminal vesicles (SVs). Intraoperative use of fluoroscopy with a cystogram can increase the extracapsular dose at the base and proximal SV compared with using ultrasound alone, with a seed source at the tip of each needle to push the dose cephalad. Visualization of the prostate base can be improved with a urinary catheter, with additional seeds placed posterior to the catheter balloon, along with additional stranded sources placed into the SV. For apical disease, a needle tip can be placed at the apex of the prostate under ultrasound guidance, and a fluoroscopic image can be referenced during the case, to ensure seed placement below the prostate apex. A peripheral loading technique is applied so that there is at least 3 mm coverage beyond the prostate radially, while additional seeds are inserted into areas of gross disease.
Results:
Our prior published experience of IRPC and selected HRPC showed excellent freedom from biochemical failure with 10-year follow-up. Our ECPB approach requires the use of more seeds ( P < .0001), compared with a standard prostate brachytherapy approach, while requiring the use of fluoroscopy in addition to ultrasound.
Conclusion:
LDR prostate brachytherapy using iodine-125 alone with extracapsular techniques is a reasonable treatment option for IRPC and selected HRPC, but unfortunately is becoming a lost art.
Introduction
Low-dose-rate (LDR) prostate brachytherapy using iodine-125 delivers the radiation with a half-life of 60 days, thus named LDR, but gives the highest numerical dose of radiation to the prostate of 14,400 cGy, delivering ablative doses to the prostate. Modern techniques of LDR were developed in 1985 and applied mostly to low-risk prostate cancer, while used as a boost for intermediate-risk prostate cancer (IRPC) and high-risk prostate cancer (HRPC).1 - 3 Studies have shown that dose escalation using external radiation leads to improved oncological outcomes for IRPC and HRPC, so why shouldn’t brachytherapy alone be used in this setting?4, 5 Can brachytherapy adequately dose the capsule, without supplemental external beam radiation therapy (S-EBRT)? Randomized trials have not shown a clear benefit with the addition of S-EBRT.6, 7 Our aim is to describe extracapsular prostate brachytherapy (ECPB) techniques so that it can used as monotherapy for patients with unfavorable IRPC and selected HRPC.
Materials and Methods
Origins
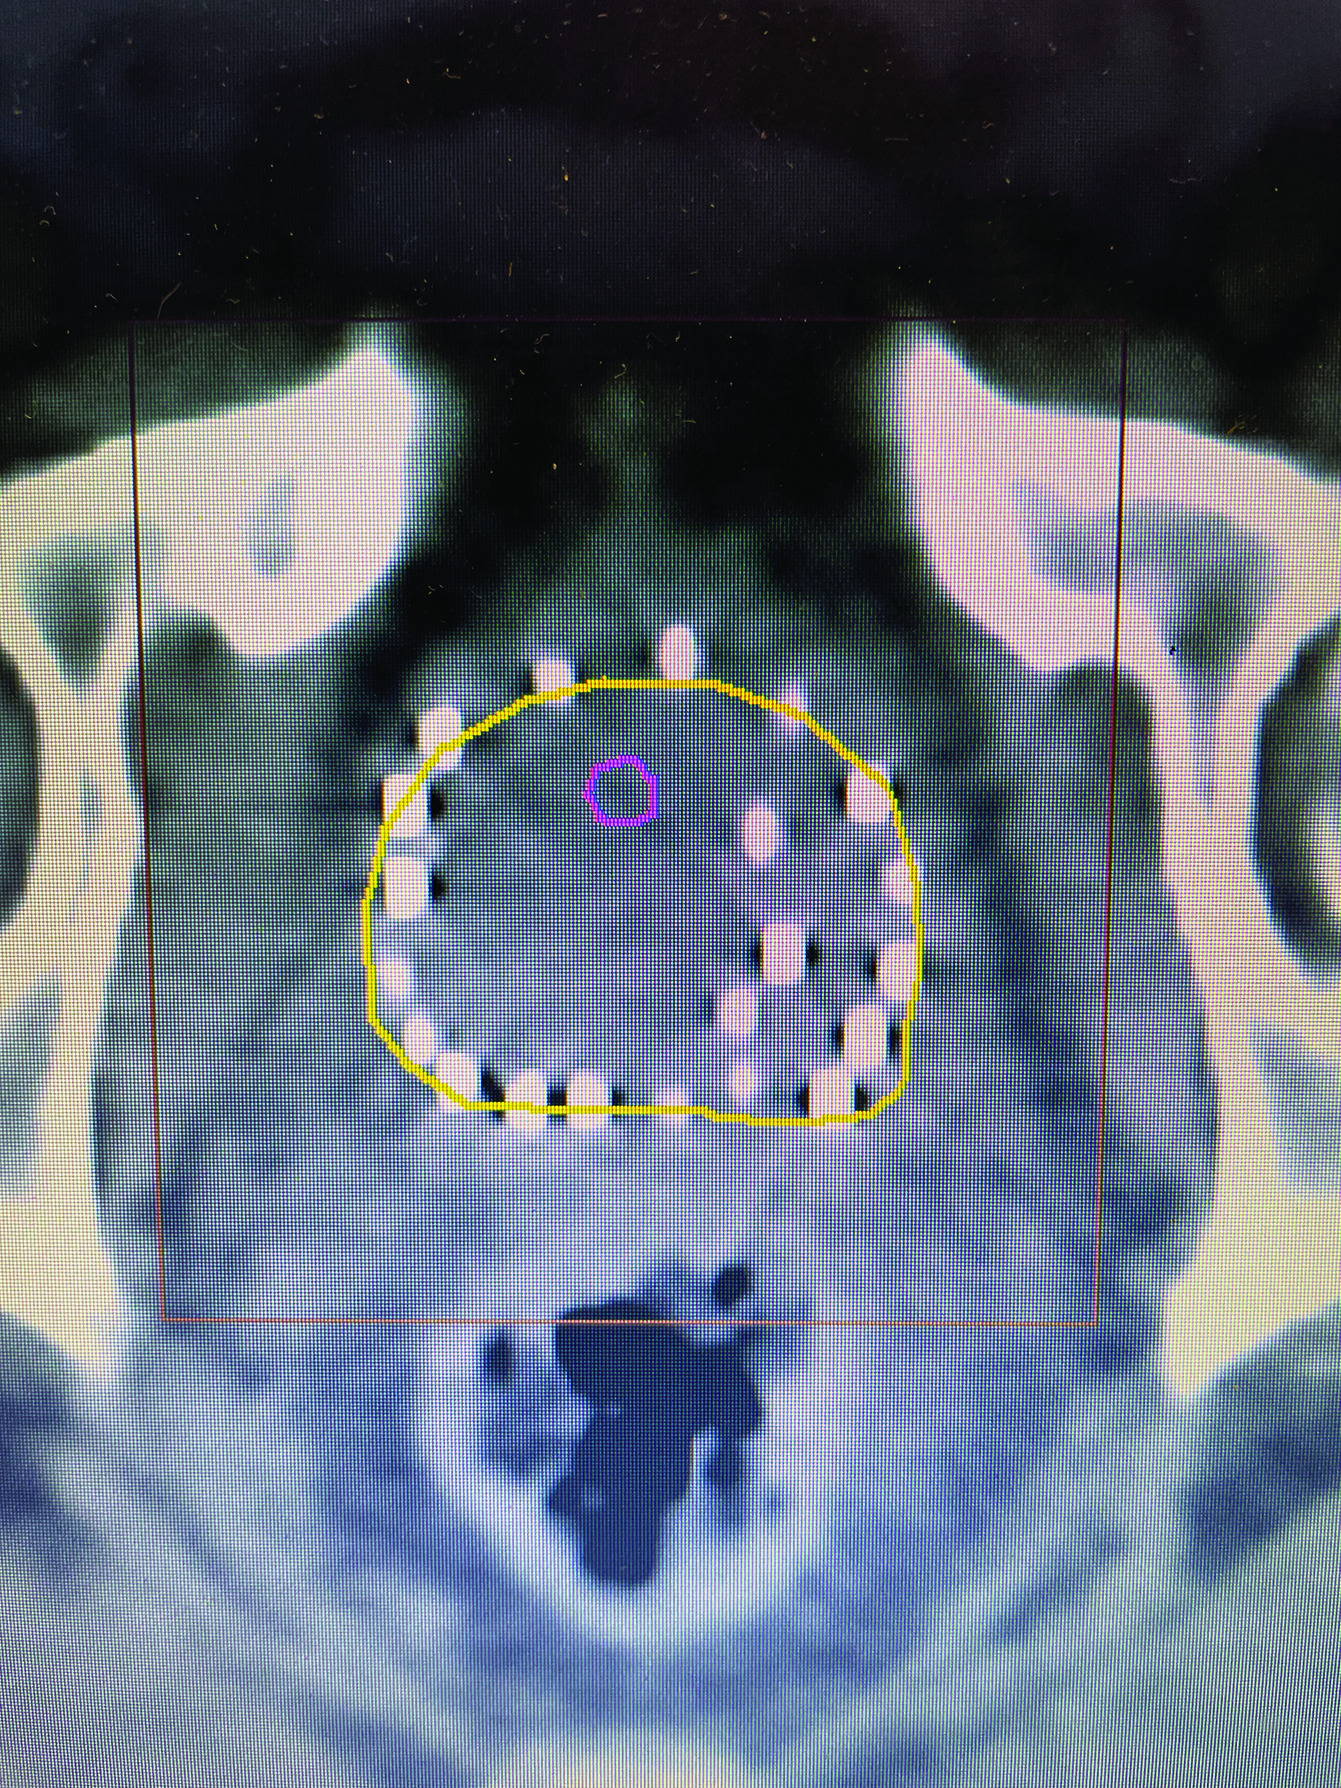
Techniques of modern LDR prostate brachytherapy started in 1985 using transperineal needle placement under ultrasound guidance and a stepper-stabilizer apparatus, which began using loose iodine-125 and palladium-103 seeds.8 Because of migration of individual loose seeds placed beyond the capsule, it was felt that LDR brachytherapy might not adequately cover capsular disease, and thus its use was limited to low-risk prostate cancer, or as a boost for those with IRPC and HRPC. With advances in computer planning, it was later felt that capsular coverage could still be obtained by a peripheral loading technique ( Figure 1 ), although seed migration could occur, and post-procedure CT dosimetry was required to document dosimetric parameters of the implant.9, 10 In the past, stranded seeds would jam in the needle, but later reliable stranded seeds became available, and we prefer the braided strand, which has a rougher external texture as opposed to a sleeve strand that feels smooth.
CT image of peripheral loaded seeds, with extra at left tumor location.
Dosimetric Goals
Our preplanning goal is to achieve a minimum prostate V100 of > 95%, prostate D90 of > 115%, urethral V150 close to 0, and rectal V100 of < 1.5 cc. Our planning target volume (PTV) margin is 3 mm beyond the prostate, but less posteriorly near the rectum, depending on the anatomy and tumor location.
Preplanning
Preplanning studies should include cross-sectional imaging to calculate prostate size and assess pubic arch interference. Measurement of post-void residual should be performed, along with a uroflow study, and assessment of the patient’s American Urological Association (AUA) urinary score.11
Our preference is to perform preplanning ultrasound, so that strands can be customized to the patient’s anatomy and tumor location, during which a urethral catheter is placed with a 10 mL balloon in the bladder, which helps visualize the urethra, and the prostate base as it extends posterior to the catheter balloon. In most cases, the urethra is in the middle of the prostate, although it tends to course anteriorly at the base. However, in a minority of patients, the urethra is deviated to the side, so urethral mapping may help reduce future urinary toxicity. The zero plane should be the most cephalad portion of the prostate and proximal seminal vesicles (SVs), which in most cases should have the catheter balloon visualized anteriorly. Five-mm images are loaded onto the Variseed 8.0.1 fusion program using 0.4 milliCuries per seed. Two slices are added below the apex of the prostate to achieve an adequate PTV margin. However, at the anterior prostate base, additional sources cannot be placed due to the location of the bladder. Thus, when preplanning, each needle should have a source at the needle tip to obtain adequate coverage at the prostate base and proximal SV ( Figure 2 ). The plan may show an absence of seeds at the zero plane anteriorly since this is the location of the catheter balloon. The anterior needle tips ending at the prostate/bladder junction are normally ~5 mm caudal to the posterior needle tips as the prostate/bladder junction is not a vertical line. Additional sources can be placed in areas where the tumor is known to be present based on digital rectal exam, imaging, and/or location of core biopsies to perform simultaneous integrated boost ( Figure 1 ). Seeds are alternated with spacers, although back-to-back seeds can be placed in areas away from the rectum and urethra. Advances in software make preplanning user-friendly, and should only take about 20 minutes. Delegating this task to a physicist/dosimetrist is not ideal as they may not understand the anatomy as well, nor have knowledge of tumor location, and may not be aware of prior areas of suboptimal coverage or excess dose to the urethral and rectum on prior post plans.
Zero plane showing anterior needle placement 5 mm caudal to posterior needles due to the anterior location of the bladder.

Operating Room Implant
Patients are placed in high lithotomy, and the legs may be extended to avoid pubic arch interference. In addition to the patient’s bowel prep, after the patient is anesthetized, a pool suction is placed into the rectum, to suction out any residual stool, liquid, or gas, which can markedly interfere with the ultrasound image of the prostate. Also, the transducer cover should be aspirated for any air bubbles using a blunt catheter tip syringe. Prior to inserting the urethral catheter, viscous lidocaine is inserted into the penile urethra for additional lubrication, and the catheter is inserted all the way until it reaches the balloon port, with evidence of urine returning, to minimize the risk of the balloon being inflated inside the prostate. Once the catheter is inserted into the bladder, 10 mL of iodinated contrast is used to inflate the catheter balloon, after which the bladder is emptied with a large catheter tip syringe, and an additional 30 mL of iodinated contrast is placed into the bladder for a cystogram, which can be viewed during the entire case using fluoroscopy ( Figure 3 ).
Extracapsular prostate brachytherapy using a cystogram showing extracapsular placement of seeds at the prostate/bladder junction.
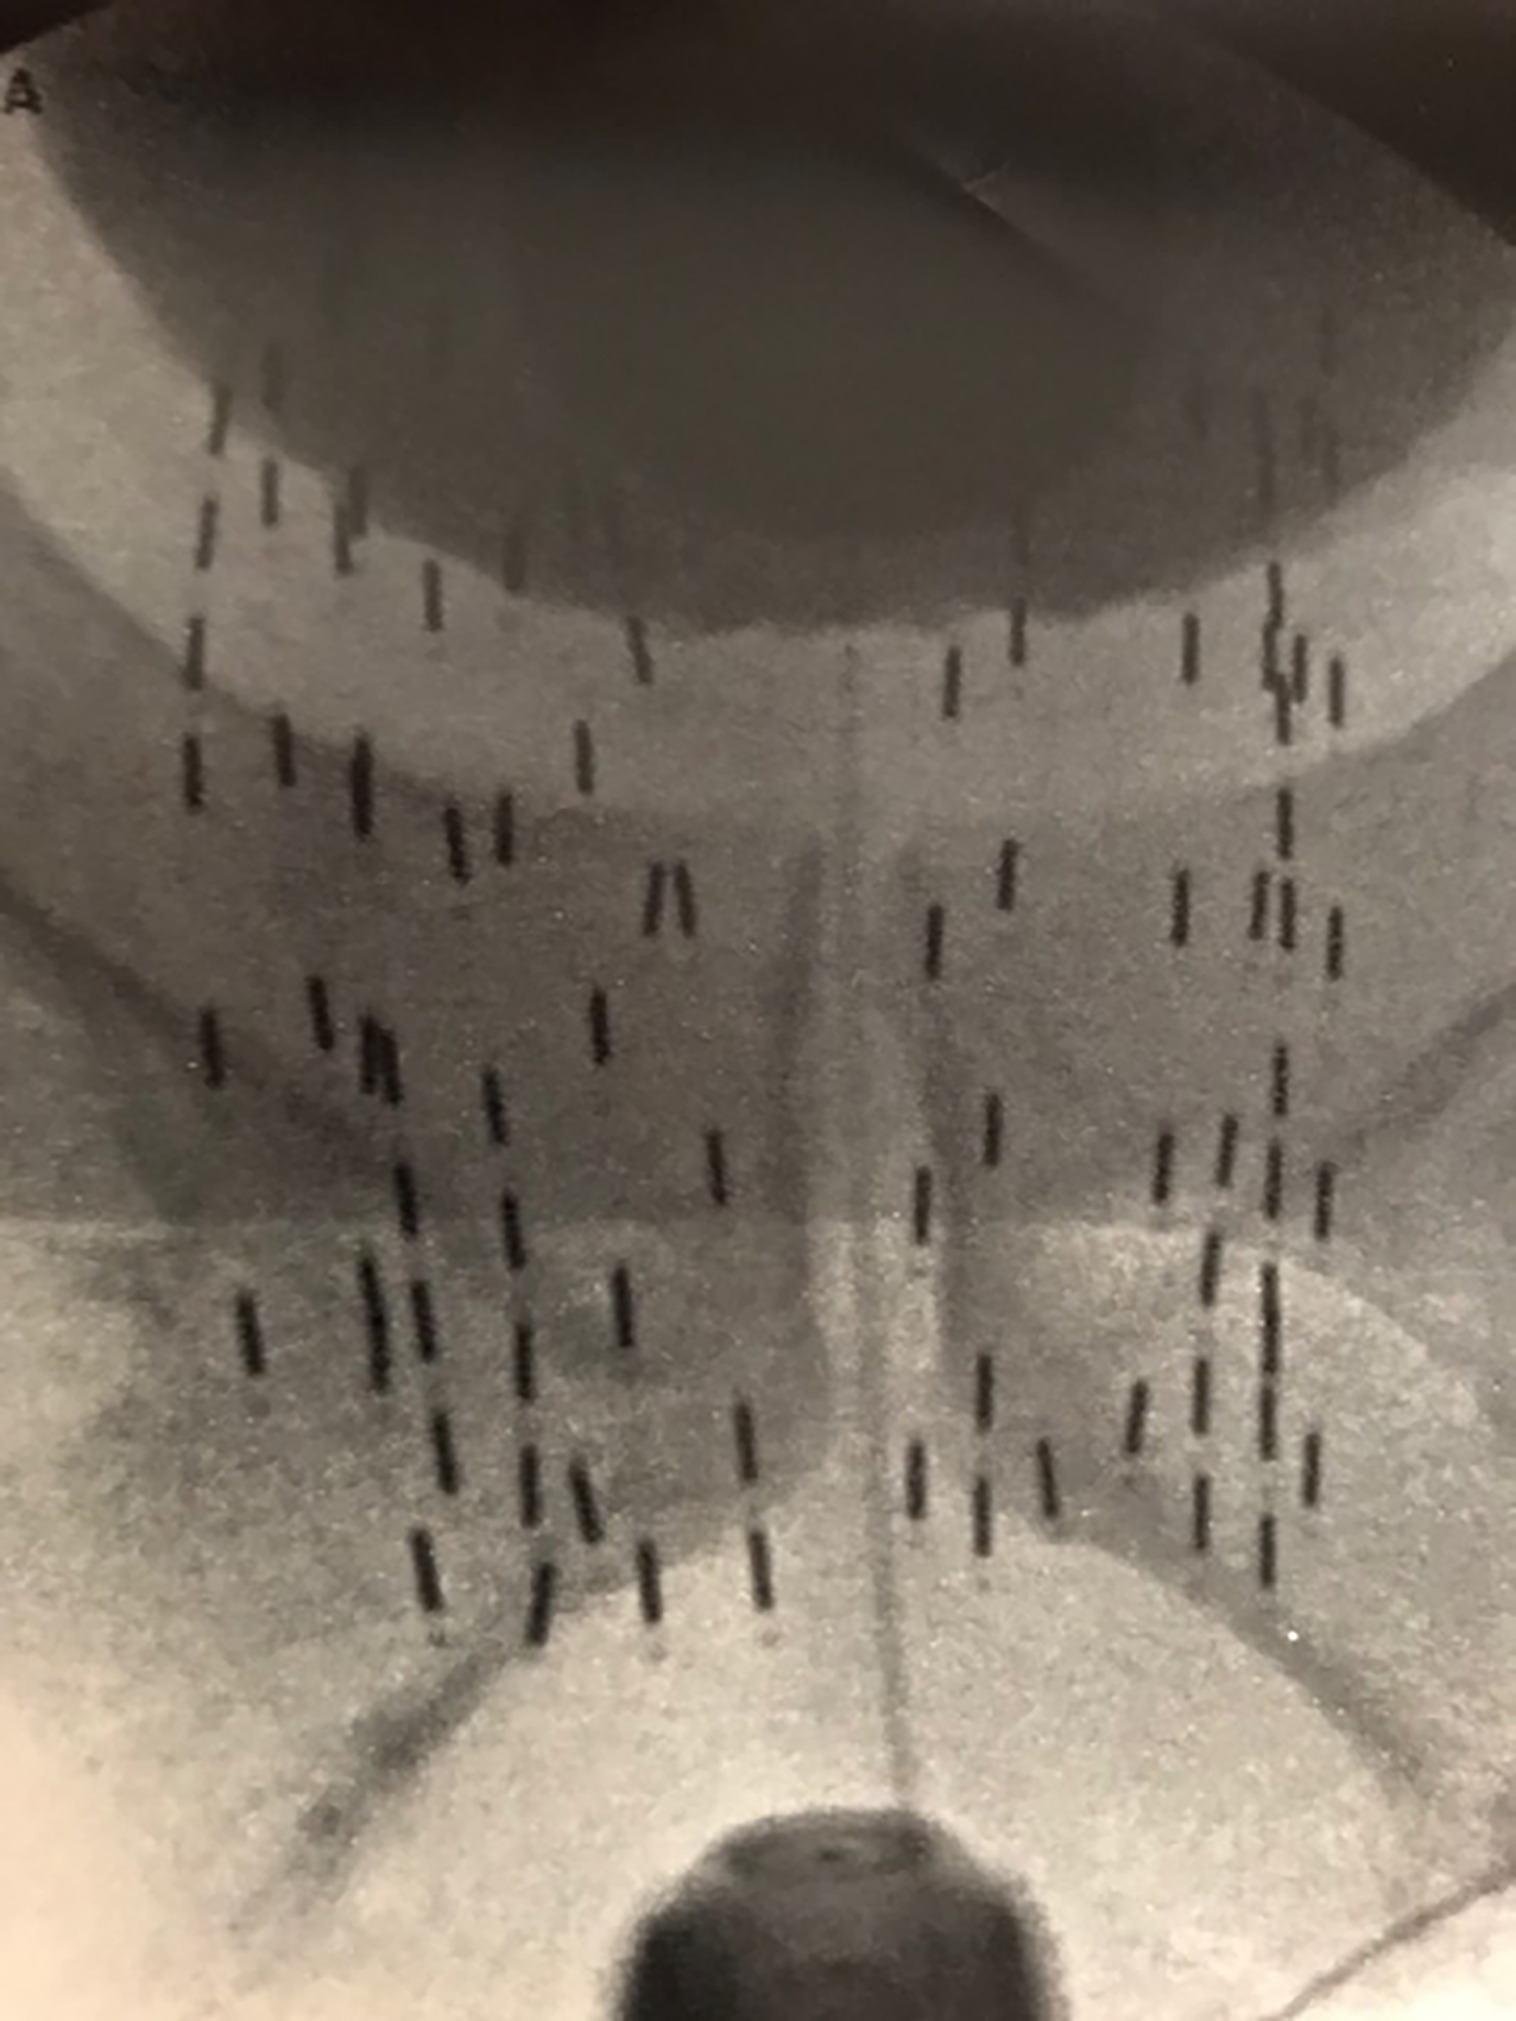
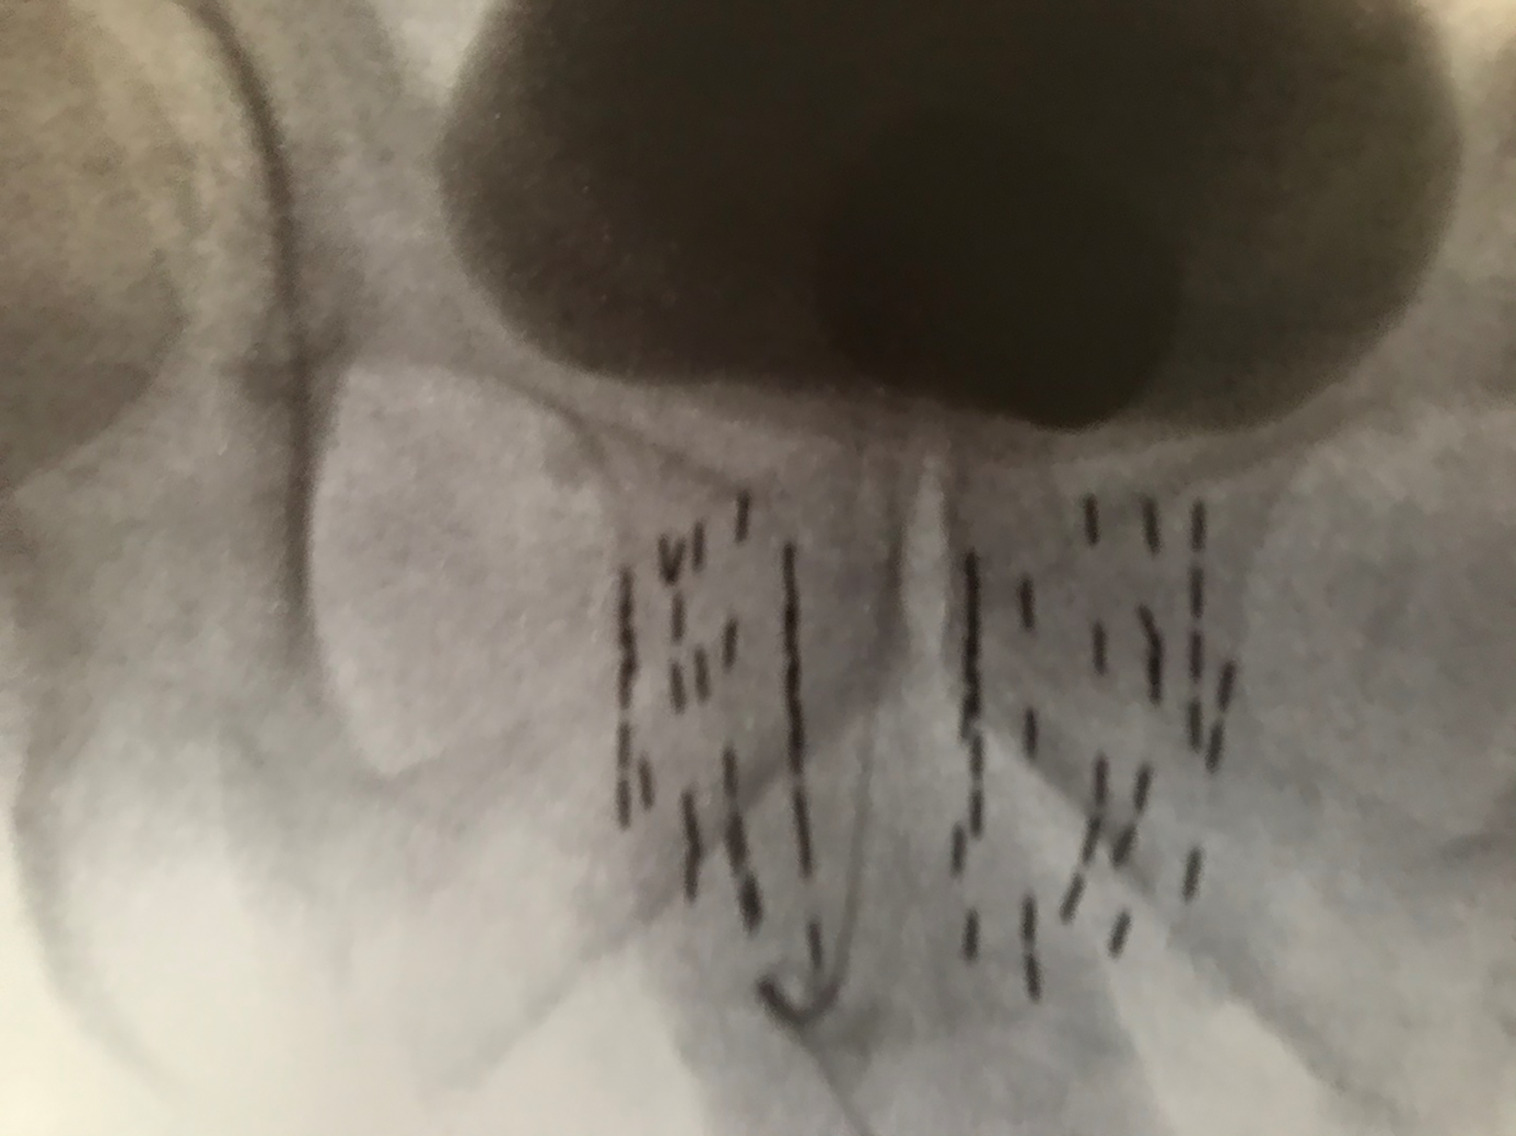
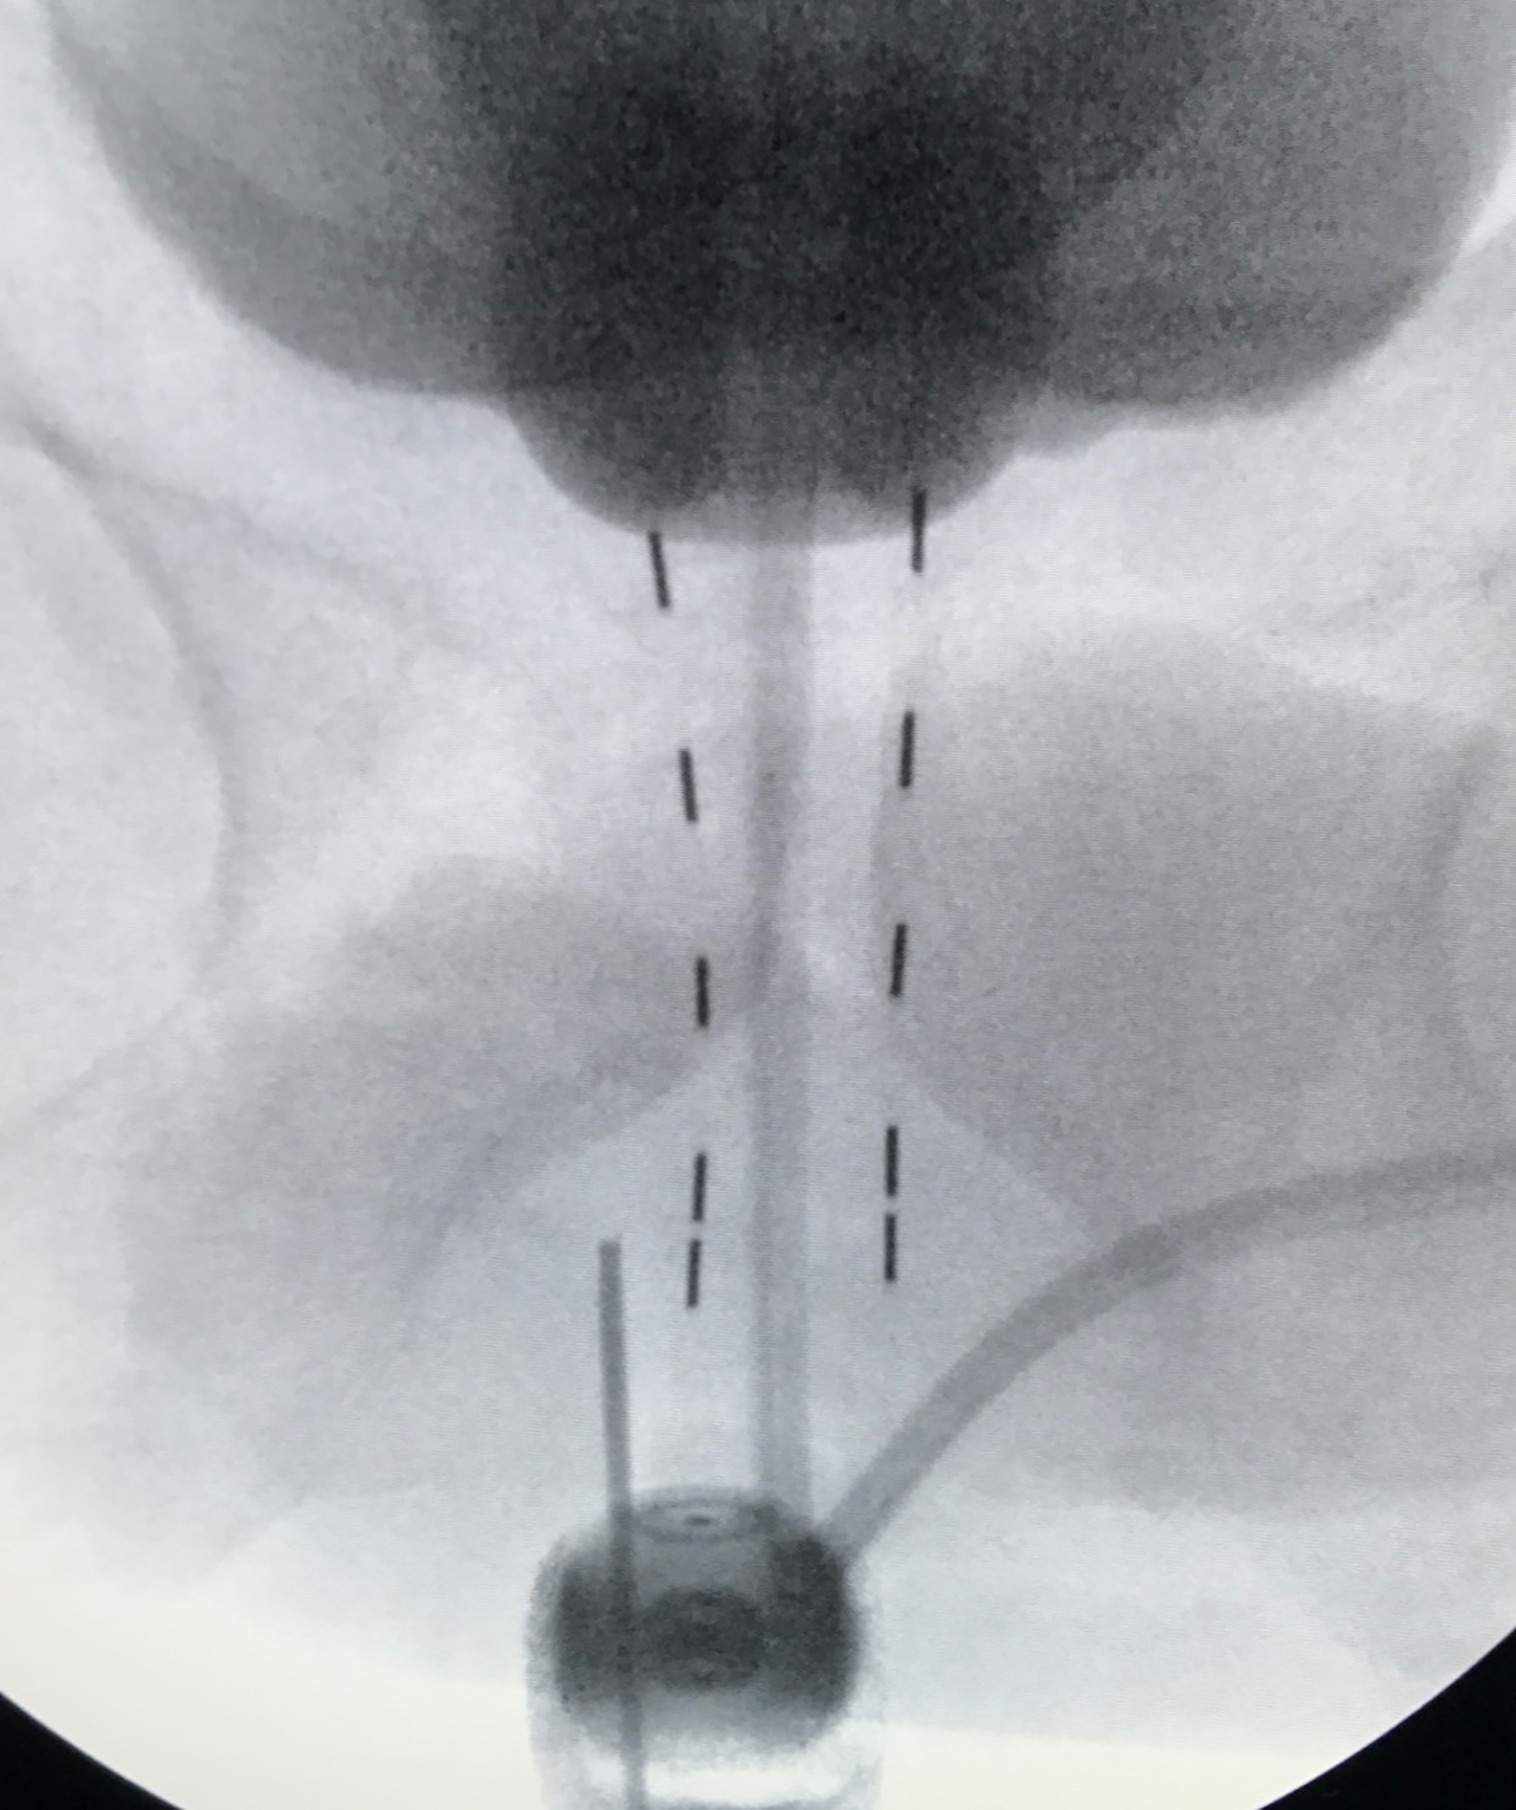
Many physicians implant using ultrasound alone, with fluoroscopy used only to align the angle of the probe parallel to the symphysis pubis, and to document final placement at the end of the implant, which is the standard prostate brachytherapy (SPB) approach ( Figure 4 ).8 During the implantation of each needle, fluoroscopy can provide additional anatomic information during the implant, in addition to ultrasound. I do not prioritize aligning the probe parallel to the symphysis, but rather to the urethra at the base and apex of the prostate. Both the contrast in the catheter balloon and the bladder help visualize the prostate/bladder junction using fluoroscopy, in addition to the ultrasound ( Figure 3 ). When using ultrasound alone, the most cephalad portion of the seeds may still be 5-10 mm below the bladder base ( Figure 4 ). Thus, using fluoroscopy with a cystogram allows further advancement of seeds, covering extracapsular disease at the base and proximal SV, which illustrates our ECPB approach ( Figure 3 ), compared with SPB ( Figure 4 ). When placing the first two anterior needles, which are periurethral (5 mm from midline), localize the most cephalad extent of needle tip placement using ultrasound, pushing each needle to the prostate/bladder junction anteriorly. Then perform fluoroscopy, and for many cases, there is additional needle advancement that can be performed toward the prostate/bladder junction, based on the cystogram. When the tip reaches the prostate/bladder junction, one normally feels a rebound of the needle going caudal. Carefully advance the needle tip going as far cephalad as possible, without puncturing the bladder/catheter balloon. This should be repeated for all the needles. If you feel a sudden release of pressure, you’ve gone too far and likely punctured the bladder and/or catheter balloon. When loading the seeds, the physicist/dosimetrist may suggest retracting the anterior needles, assuming the prostate/bladder base junction to be a straight vertical line; but it’s not. In most patients, the prostate/bladder junction anterior needle tips are slightly caudal to the posterior needle tips, and normally the anterior needles are already retracted ~5 mm distally, so that they do not puncture the bladder. Thus, initial retraction of the stepper is not required for these anterior needles ( Figure 2 ). After placement of the two most anterior rows of seeds, place an empty needle through the perineum and place the needle tip at the bottom of the prostate apex based on ultrasound, and then save this image onto the fluoroscopy unit. This image can serve as a reference to the bottom of the apex throughout the case as one can see where the needle tip is in relation to the two anterior rows of seeds. If you did your preplan correctly, the caudal extent of the anterior strands should be just below the needle tip ( Figure 5 ). Since these two rows of strands are fixed, they can serve as a reference to the saved fluoroscopy image with the empty needle tip at the apex of the prostate. Continue implanting from anterior to posterior, and when placing needles at the proximal SV, one may also feel a rebound of the needle going caudal. Carefully advance ~5-10 mm, so that one is as far cephalad without puncturing the bladder, in which the posterior needles usually are placed more cephalad than the anterior needles. However, in implanting each needle, confirm that the needles that were meant to go below the prostate apex, in obtaining PTV coverage on your preplan, are still below the needle tip that marked the prostate apex on your saved fluoroscopy image.
Prostate-only implant or standard prostate brachytherapy (SPB) using ultrasonography alone to place seeds.
Needle tip marking the bottom of the prostate apex.
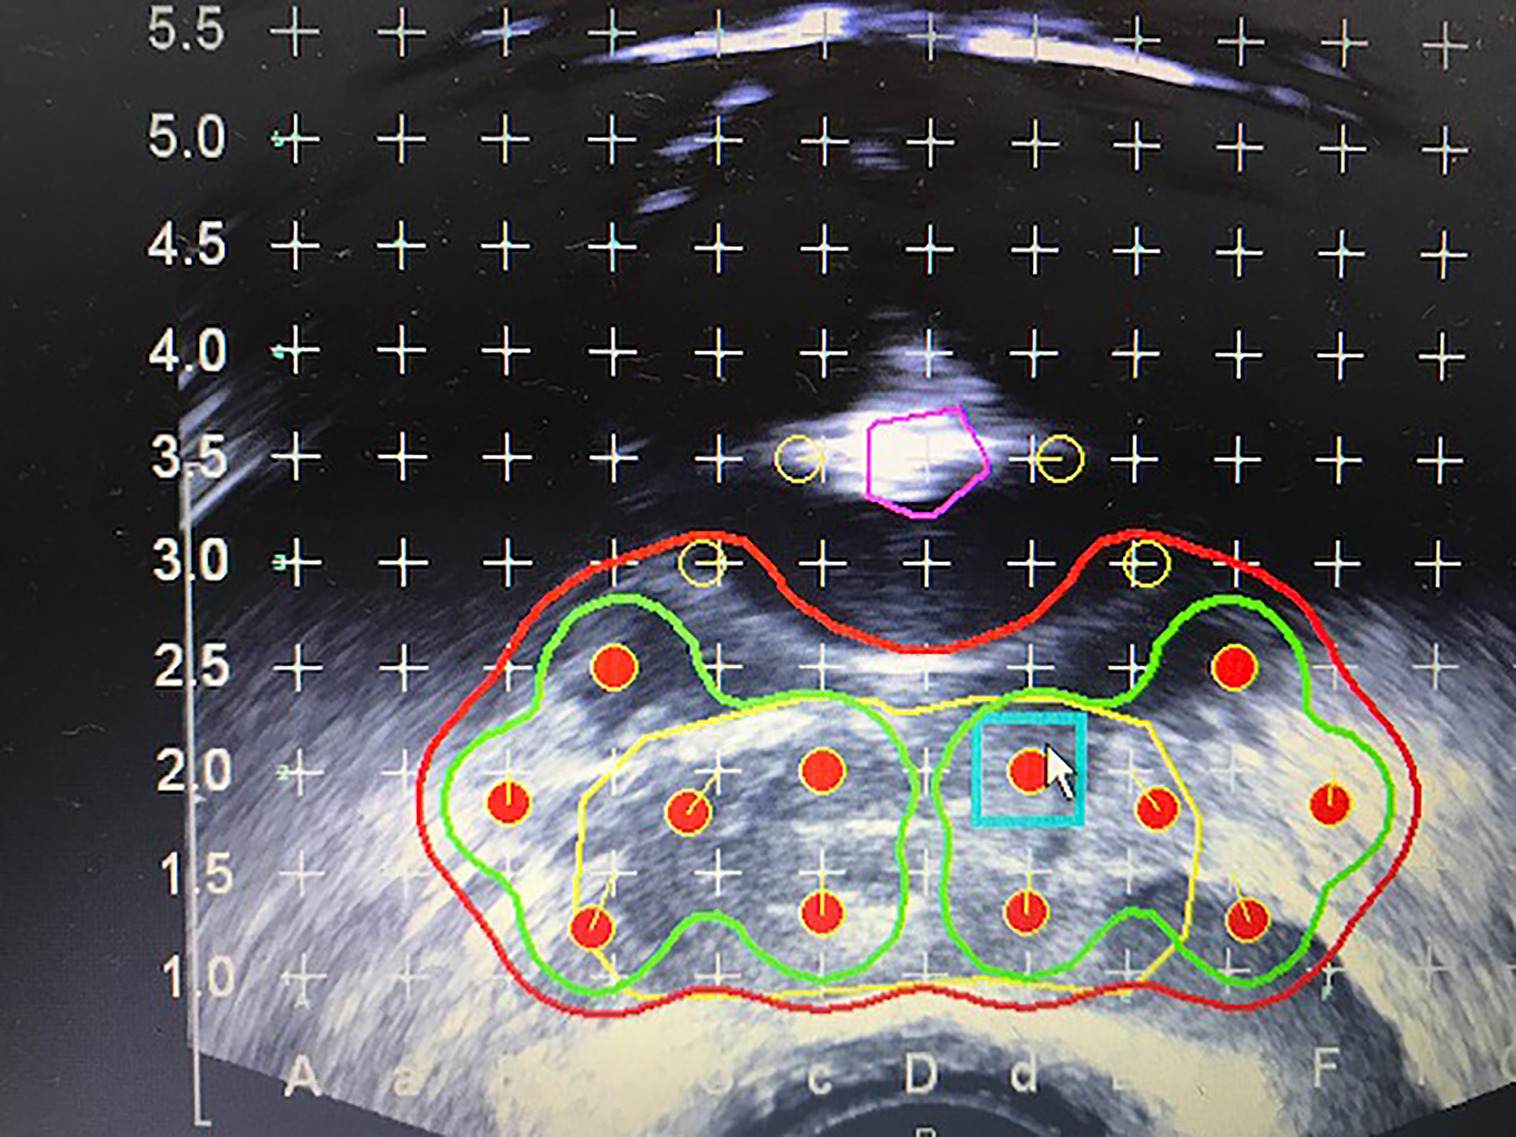
During the placement of each needle, one may use a needle adjustment device, otherwise known as a “diddler,” which looks like a crochet needle with a reverse function. While a helpful device, one must be careful not to overbend as the needle may break, resulting in a retained needle inside the patient. Also, be mindful of the spacing of strands relative to one another and the prostate movement that may be happening, as you may need to readjust the stepper-stabilizer unit. Additional loose seeds may be placed posterior to the catheter balloon to fill in the central isodose at the base of the prostate and proximal SV ( Figure 6 ).
Additional loose seeds placed posterior to the catheter balloon in rows 2 and 2.5 to fill in isodose at the central prostate base. Red = 100% (14,400 cGy), green = 150% (21,600 cGy), and yellow = proximal seminal vesicle clinical target volume.
Postplanning
We typically schedule postplanning CT about 1 week after the implant as some patients require catheter removal and to assess whether the seeds are covering the base and apex of the prostate adequately. We use the Variseed 8.0.1 fusion program to fuse our preplanning ultrasound onto the CT postplan, although the fusion may need editing since the ultrasound images are affected by the presence of the probe. If the physician considers the postplan suboptimal, additional seeds can be placed later. It is important that the physician be involved in delineating the prostate on the CT postplan as this process gives the physician feedback about areas of suboptimal coverage, as well as areas of excessive dose near the urethra and rectum. Assigning CT postplanning contouring to the physicist/dosimetrist may give different dosimetric outcomes since their perception of prostate anatomy may be different from the physician’s.
Implanting the Mid-Distal Seminal Vesicle
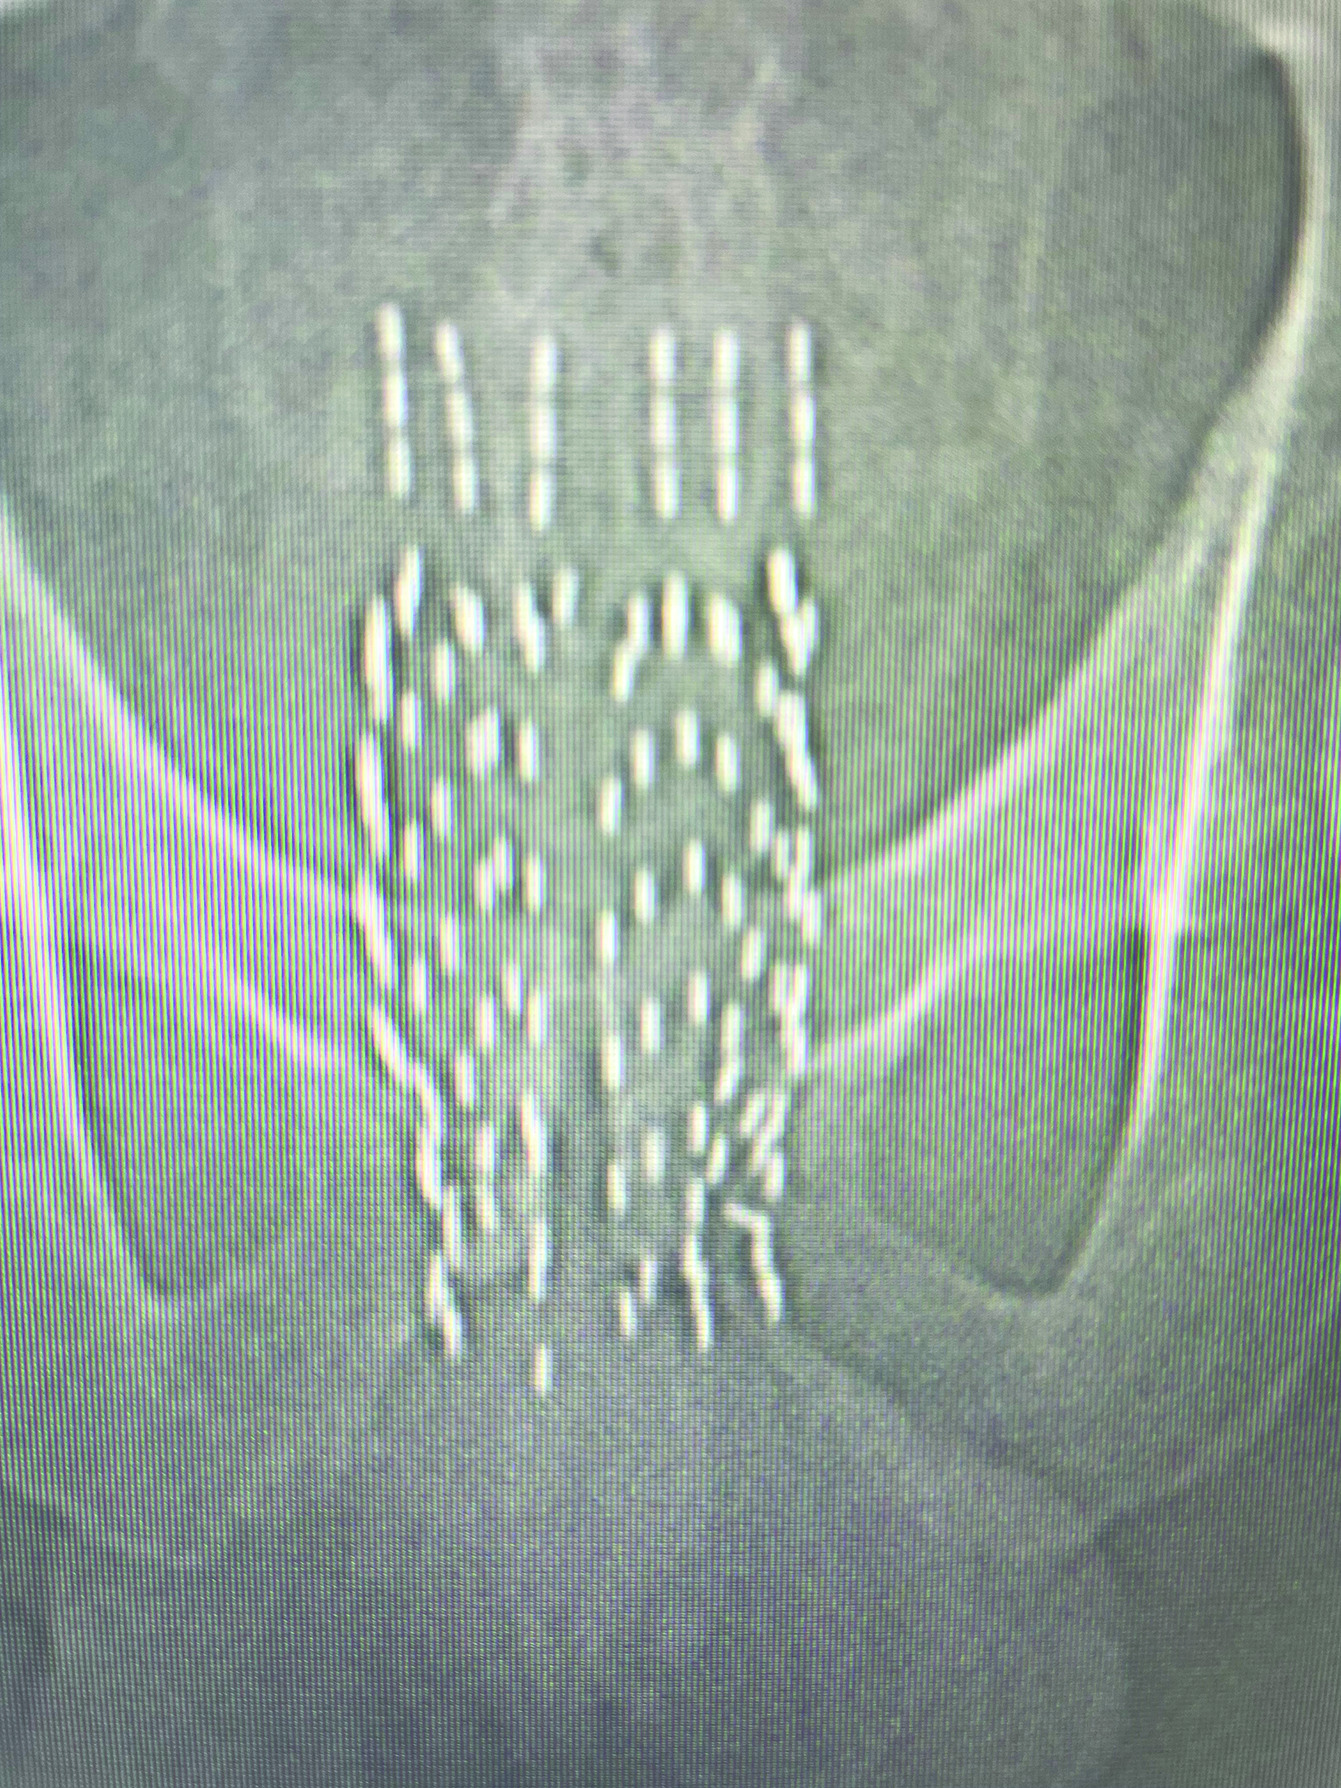
Depending on the size and shape of SV on cross-sectional imaging, one may use 3 parallel needles per vesicle using a seed at the most proximal extent, followed by a spacer, and then 2-4 additional back-to-back seeds, so that each needle will have 3-5 seeds per needle. The purpose of the proximal seed spacer is to reduce the potential rectal hot spot that may occur near the prostate base/proximal SV due to the contribution of radiation from the prostate sources, which can be seen on the preplan. The zero plane would be the location of the most proximal source, above which would be a spacer and back-to-back seeds in the strand ( Figure 7 ). If one is concerned about rectal dose, a rectal spacer may be placed after placement of all the seeds. Prior to implanting the SVs, deflate the contrast out of the catheter balloon so that one can visualize the placement of the SV strands under fluoroscopy.
Prostate fluoroscopy image with seminal vesicles implanted.
Results
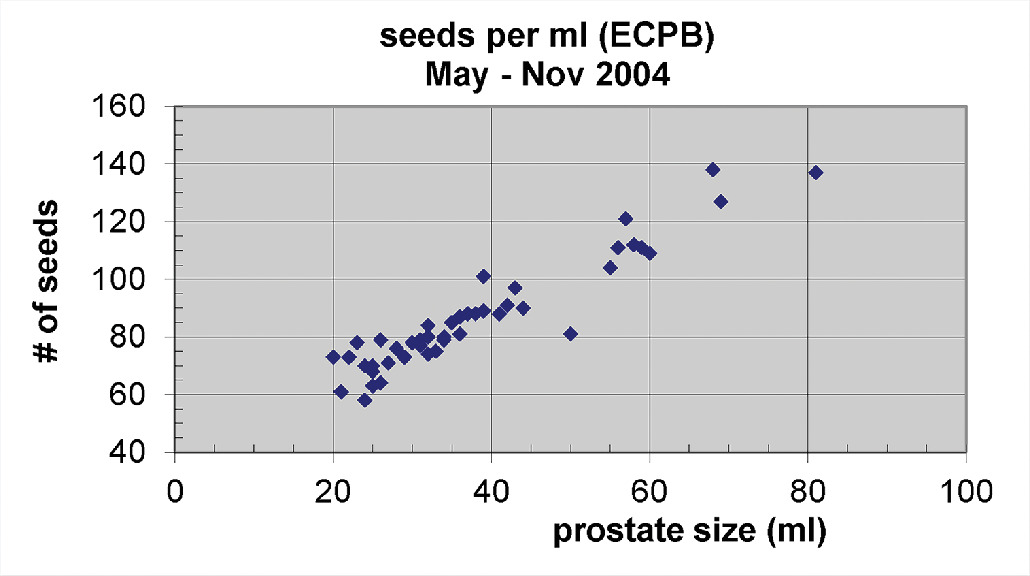
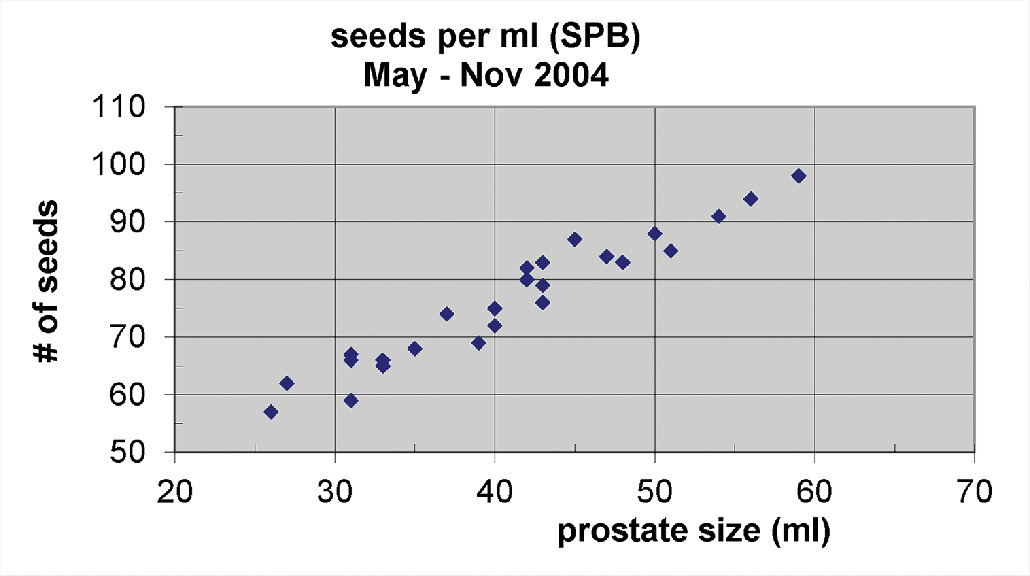
Our experience using predominantly monotherapy LDR brachytherapy alone for IRPC and HRPC prostate has yielded encouraging 10-year freedom from biochemical failure (FFBF) results with acceptable complications.12 - 14 This ECPB with peripheral loading may not require S-EBRT, but does require more seed sources; whereas if one implants with SPB, one can see a significantly lower number of seeds required per unit size of the prostate ( P < .0001; Figures 8 and 9 ).15 When one compares ECPB ( Figure 3 ) vs SPB ( Figure 4 ) in which fluoroscopy is not used to place extracapsular seeds beyond the base, there is an absence of seed coverage between the bladder and prostate base for SPB.
Number of seeds needed per unit prostate size using peripheral loading and fluoroscopy with extracapsular prostate brachytherapy (ECPB) approach.
Number of seeds needed per unit prostate size using standard prostate brachytherapy (SPB).
Discussion
Current Status
According to the National Comprehensive Cancer Network guidelines in 2015, the role of LDR brachytherapy should be limited to patients with low-risk disease but later allowed favorable IRPC.16 Our 10-year results using mostly monotherapy LDR for unfavorable IRPC and HRPC have shown impressive FFBF results, which may be partly due to ECPB techniques in implanting the prostate and surrounding capsule, while providing ablative doses to the prostate, with a median PSA nadir value of < 0.1.12, 14, 17 A SPB approach may be more suited as a boost for patients with unfavorable IRPC and HRPC ( Figure 4 ).
Despite these encouraging results, we do not recommend implanting those with gross SV invasion, nor those with a significant risk of long-term urinary retention. These include patients with a large median lobe, prostate size > 70 cc, AUA urinary score > 15, and/or peak urinary flow of < 5 mL/s.13 It is worth noting that our 10-year LDR brachytherapy results mostly implanted the prostate and proximal SV using ECPB ( Figure 3 ).12, 14
Important Principles
An important key to a good implant procedure is visualization. Many of the tips listed above emphasize knowing where the base and apex of the prostate are located during the implant, so that higher doses can be extended beyond the capsule. The priority should be implanting the prostate, not the prostate template grid. Be mindful of needle/seed spacing and prostate movement when using the techniques listed above.
Future Direction
With the advent of prostate-specific membrane antigen positron emission tomography (PSMA-PET) scans, we have noticed cases of isolated SV recurrence after brachytherapy alone. With the availability of reliable stand products, the SVs can be implanted with the goal of reducing one’s risk of isolated SV recurrence ( Figure 7 ). While our 10-year results of IRPC and selected HRPC only implanted the proximal SV, this more extensive SV implant described in Figure 7 is a newer approach for which we do not have long-term outcomes. Our goal is to see if future risk of isolated SV failures for unfavorable IRPC and HRPC can be reduced, although we still do not routinely recommend brachytherapy alone for those with initial SV involvement on MRI or PSMA-PET. With the increasing use of MRI and PSMA-PET, one can better select unfavorable IRPC and HRPC who may not have initial SV invasion.
Due to low reimbursements and higher complexity of the LDR brachytherapy procedure, we have seen a substantial decline in the number of centers offering standard LDR for prostate cancer, as well as a reduction in graduating physicians being trained in standard LDR prostate brachytherapy.18 - 20 It is our hope with this publication that physicians may have more tools to perform ECPB using iodine-125 as LDR prostate brachytherapy is becoming a lost art, and few institutions have published successful 10-year results using brachytherapy alone for unfavorable intermediate and high-risk prostate cancer, which require extracapsular techniques.7, 12, 14
Conclusions
LDR prostate brachytherapy using iodine-125 alone with extracapsular techniques is a reasonable treatment option for IRPC and selected HRPC.
References
Citation
Barry W. Goy, MD. Extracapsular Prostate Brachytherapy Using Iodine-125 for Intermediate and Selected High-Risk Prostate Cancer: Technical Notes. Appl Radiat Oncol. 2024;(3):32 - 39.
doi:10.37549/ARO-D-24-00018
September 1, 2024